Programming Guide
This programming guide is a series of tutorials designed to get you started with ReSpeaker. Starting from the basics, it describes how to make voice interaction, create audio output and program Arduino on ReSpeaker.
ReSpeaker runs the OpenWrt system on MT7688, and provided with on broad ReSpeaker Python API, which makes it friendly and quickly for developers to build IoT applications. On Arduino side, ReSpeaker also provide easy-to-use ReSpeaker Arduino Library.
How to write a simple voice interaction program
With Bing Speech API, ReSpeaker can turn on and recognize audio coming from the microphone in real-time, or recognize audio from a file.
To use Bing Speech API, first you have to get a key of Microsoft Cognitive Services from here, and copy it to BING_KEY = '', then save the following code in bing.py and run it python bing.py

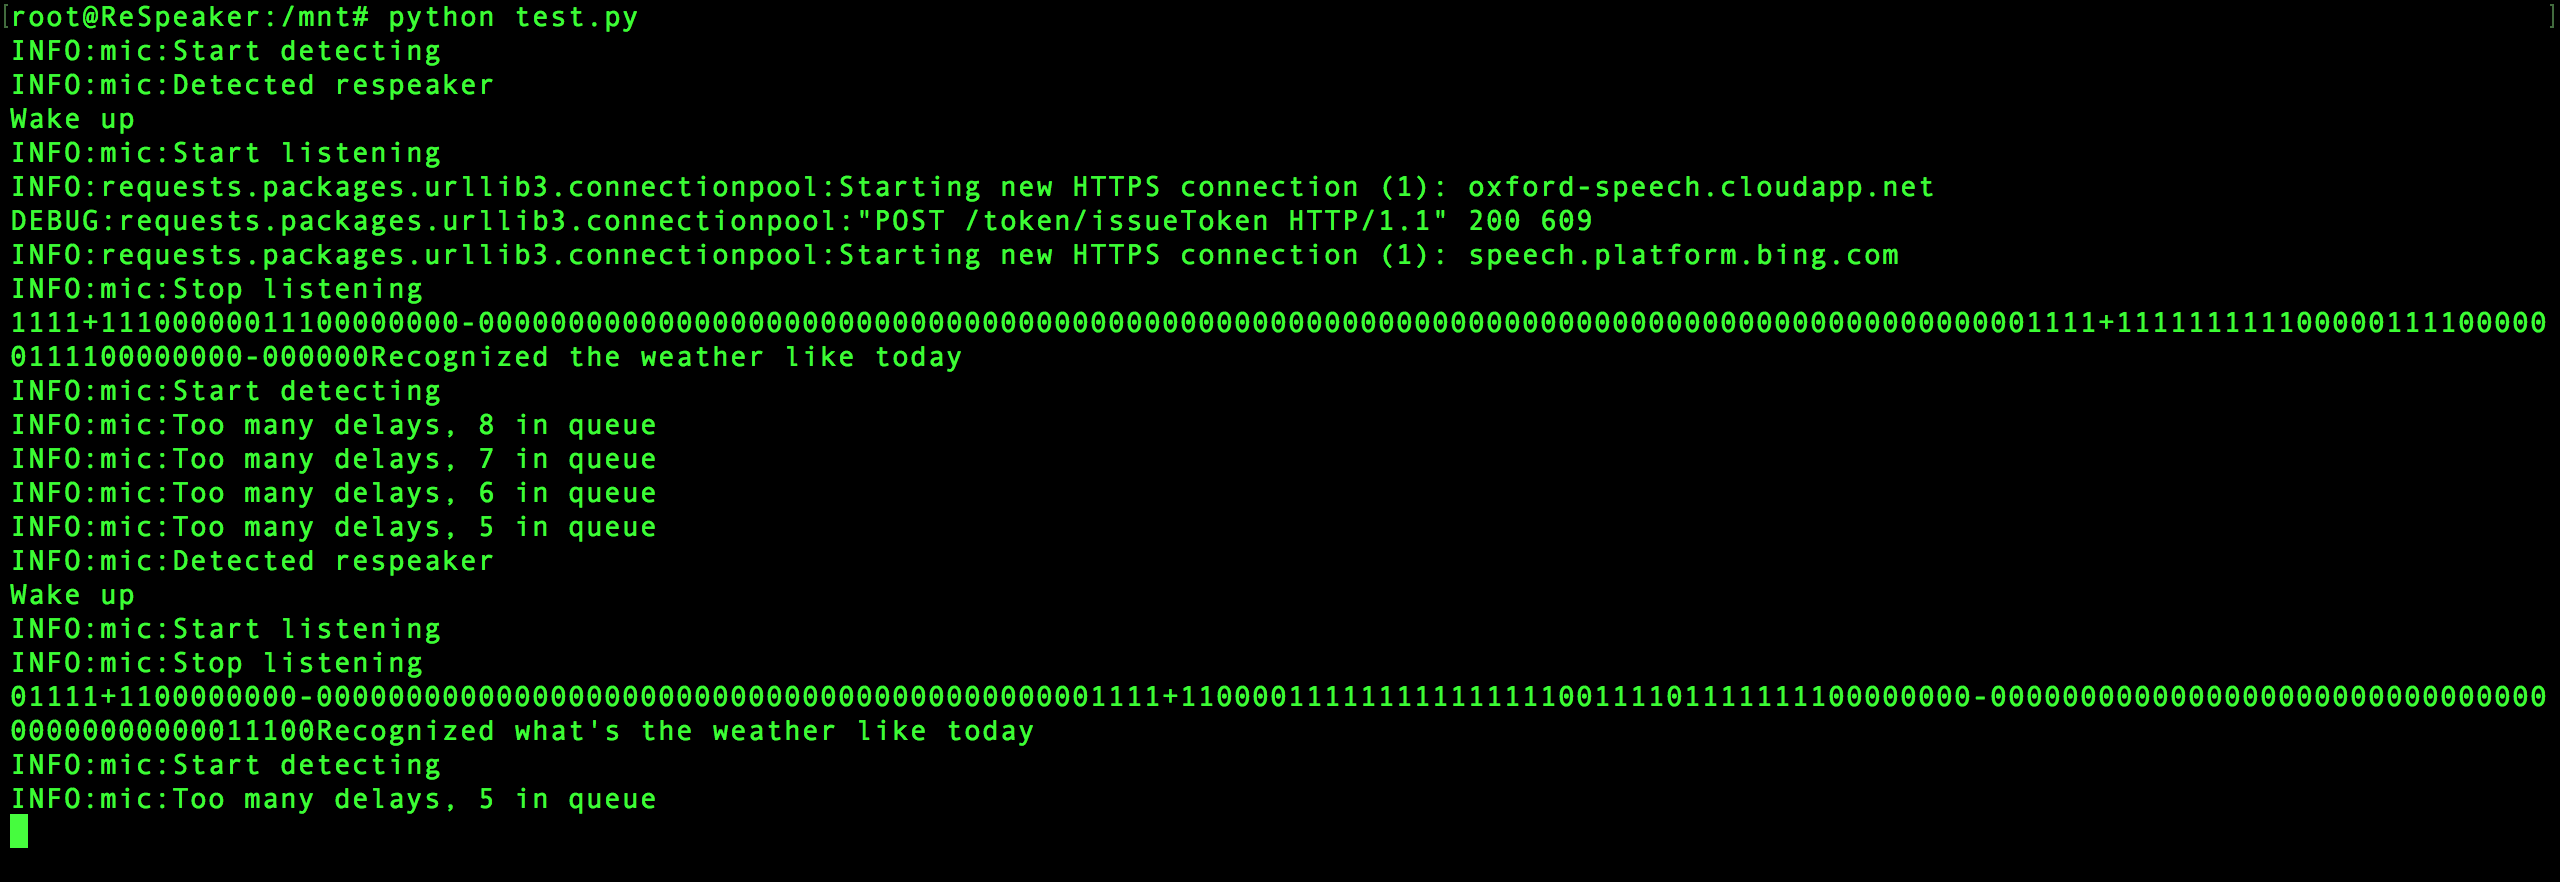
The following code is an example of how to use Bing Speech API and Microphone on ReSpeaker. After waking up ReSpeaker by saying "ReSpeaker" to the board, the code will start to record your voice, translate it to text and display it.
import logging
import time
from threading import Thread, Event
from respeaker import Microphone
from respeaker.bing_speech_api import BingSpeechAPI


# get a key from https://www.microsoft.com/cognitive-services/en-us/speech-api
BING_KEY = ''


def task(quit_event):
    mic = Microphone(quit_event=quit_event)
    bing = BingSpeechAPI(key=BING_KEY)

    while not quit_event.is_set():
        if mic.wakeup('respeaker'):
            print('Wake up')
            data = mic.listen()
            try:
                text = bing.recognize(data)
                if text:
                    print('Recognized %s' % text)
            except Exception as e:
                print(e.message)

def main():
    logging.basicConfig(level=logging.DEBUG)
    quit_event = Event()
    thread = Thread(target=task, args=(quit_event,))
    thread.start()
    while True:
        try:
            time.sleep(1)
        except KeyboardInterrupt:
            print('Quit')
            quit_event.set()
            break
    thread.join()

if __name__ == '__main__':
    main()
Play Arduino with light, touch, sound and Internet
ReSpeaker Arduino Library is a library for controlling WS2812 RGB LEDs, touch sensors, SeeedStudio Grove modules on Arduino (ATmega32U4) and building communication bridge between Arduino (ATmega32U4) and linux based OpenWrt (MT7688).
Features
- Supported capacitive touch sensing
- Implemented WS2812 RGB LED driver
- Built USB to Serial bridge and SPI bridge between Arduino (ATmega32U4) and linux based OpenWrt (MT7688)
Requirements
- Arduino IDE 1.6.8+. Please use Arduino IDE 1.6.8+ which has some useful new features
Installation
- Download zip file and extract it into Arduino's libraries directory.
- Rename
respeaker_arduino_library-mastertorespeaker - Select
Tools->Board->Arduino Leonardo
Getting Started
- Light - chasing colors
```C #include "respeaker.h"
uint8_t offset = 0;
void setup() { respeaker.begin(); respeaker.pixels().set_brightness(128); // set brightness level (from 0 to 255) }
void loop() { respeaker.pixels().rainbow(offset++); delay(10); } ```
- Touch & Sound - touch to play
```C #include "respeaker.h"
// wav or mp3 files on SD card const char *sound_map[] = {"a1.wav", "b1.wav", "c1.wav", "d1.wav", "e1.wav", "f1.wav", "g1.wav", "c2.wav"};
void setup() { respeaker.begin(); respeaker.attach_touch_handler(touch_event); // add touch event handler } void loop() {}
// id: 0 ~ 7 - touch sensor id; event: 1 - touch, 0 - release void touch_event(uint8_t id, uint8_t event) { if (event) { respeaker.play(sound_map[id]); } } ```
```C #include "respeaker.h"
#define IFTTT_MAKER_CHANNEL_KEY "" // add the key of your ifttt maker channel #define EVENT "ping"
const char *ifttt_ping = "curl -X POST https://maker.ifttt.com/trigger/" EVENT "/with/key/" IFTTT_MAKER_CHANNEL_KEY;
void setup() { respeaker.begin(); respeaker.attach_touch_handler(touch_event); // add touch event handler } void loop() {}
// id: 0 ~ 7 - touch sensor id; event: 1 - touch, 0 - release void touch_event(uint8_t id, uint8_t event) { if (event == 1 && id == 0) { respeaker.exec(ifttt_ping); } } ```
Data exchange between Arduino and OpenWrt
There are 2 data exchange ways between Arduino and OpenWrt: UART and SPI bridge.
SPI bridge
With SPI bridge, OpenWrt works as master and Arduino works as salve.
On Arduino side, the SPI data will be received in this SPI interrupt handler.
void spi_event(uint8_t addr, uint8_t *data, uint8_t len)  {
    //handle the data sent from MT7688
}
- uint8_t addr - the address of SPI
- uint8_t *data - the received data, it is a character array
- uint8_t len - the length of the received data
In ReSpeaker Arduino Library, we have an example of SPI bridge:
void spi_event(uint8_t addr, uint8_t *data, uint8_t len)
{
  if (0 == addr) {
    if (0 == data[0]) {   // all off
      color = 0x000000;
      pixels_state = 0;
    } else if (1 == data[0]) {  // specific color
      color = Pixels::RGB(data[1], data[2], data[3]);
      pixels_state = 0;
    } else if (2 == data[0] || 7 == data[0]) {    // listening mode, all green
      color = Pixels::RGB(0, 0x40, 0);
      pixels_state = 0;
    } else if (3 == data[0]) {    // waiting mode
      pixels_state = 1;
    }  else if (4 == data[0]) {   // speaking mode
      pixels_state = 2;
    } else if (5 == data[0]) {    // volume mode
      pixels_state = 3;
      volume = data[3];
      volume_changed_time = 0;
    }
  } else if (0xA0 == addr) {       // spectrum data
    pixels_state = -1;
    for (int i = 0; i < PIXELS_NUM; i++) {
      // Serial.print(data[i]);
      // Serial.print(' ');
      pixels->set_color(i, change_brightness(b2r(i * 255 / (PIXELS_NUM - 1)), data[i]));
      // pixels->set_color(i, change_brightness(b2r(data[i]), data[i]));
    }
    pixels->update();
    // Serial.print("\r\n");
  }
}
Note: Please stop mopidy service on OpenWrt before using SPI bridge
/etc/init.d/mopidy stop
On OpenWrt side, there is a spi instantiation in "respeaker" package. Import it from "respeaker", and send data with spi.write(self, data=None, address=None) method.
 def write(self, data=None, address=None):
            if address is not None:
                data = bytearray([0xA5, address & 0xFF, len(data) & 0xFF]) + data + bytearray([crc8(data)])
                response = self._write(data)[3:-1]
            else:
                response = self._write(data)

            return response
- data - the data sent to Arduino, it should be a bytearray
- address - the address of SPI
from respeaker import spi
//send data [1, 0, 0, 50] to Arduino, which will make the leds turn blue.
spi.write(data = bytearray([1, 0, 0, 50]), address = 0x00)
UART
There are 2 serial ports available in ATmage32U4: "serial" and "serial1". The "serial" is sumilated by the USB port shared with MT7688 and the "serial1" (on TXD1 and RXD1) is connected to MT7688 (on UART_RXD2 and UART_TXD2). They have been set their baudrate to 57600 bps in respeaker.begin().
void ReSpeaker::begin(int touch, int pixels, int spi)
{
    Serial.begin(57600);
    Serial1.begin(57600);
    ......
}
ReSpeaker Arduino Library provides 2 menthods to send Linux command to Openwrt Shell directly.
void ReSpeaker::play(const char *name)
{
    Serial1.print("play ");
    Serial1.print(name);
    Serial1.print('\n');
}
Send a play-music command to OpenWrt shell
- const char *name - the absolute path or SD card path of your music file
void ReSpeaker::exec(const char *cmd)
{
    Serial1.print(cmd);
    Serial1.print('\n');
}
Send a Linux shell command line to OpenWrt Shell
- const char *cmd - Linux shell command line
Fruit piano

Rather than the on board MT7688 Wi-FI module which runs the Linux based OpenWrt, ReSpeaker is also powered by the ATmega32u4 chip and it’s absolutely Arduino compatible, which means, we can use ReSpeaker as a powerful Arduino board and do many ‘Arduino’ things. It’s for learning, it’s for practicing, and it’s for fun.
For example, you can program it with Arduino IDE to have a special DIY piano that is built on 8 cherry tomatoes connecting to the 8 touch sensors of ReSpeaker.
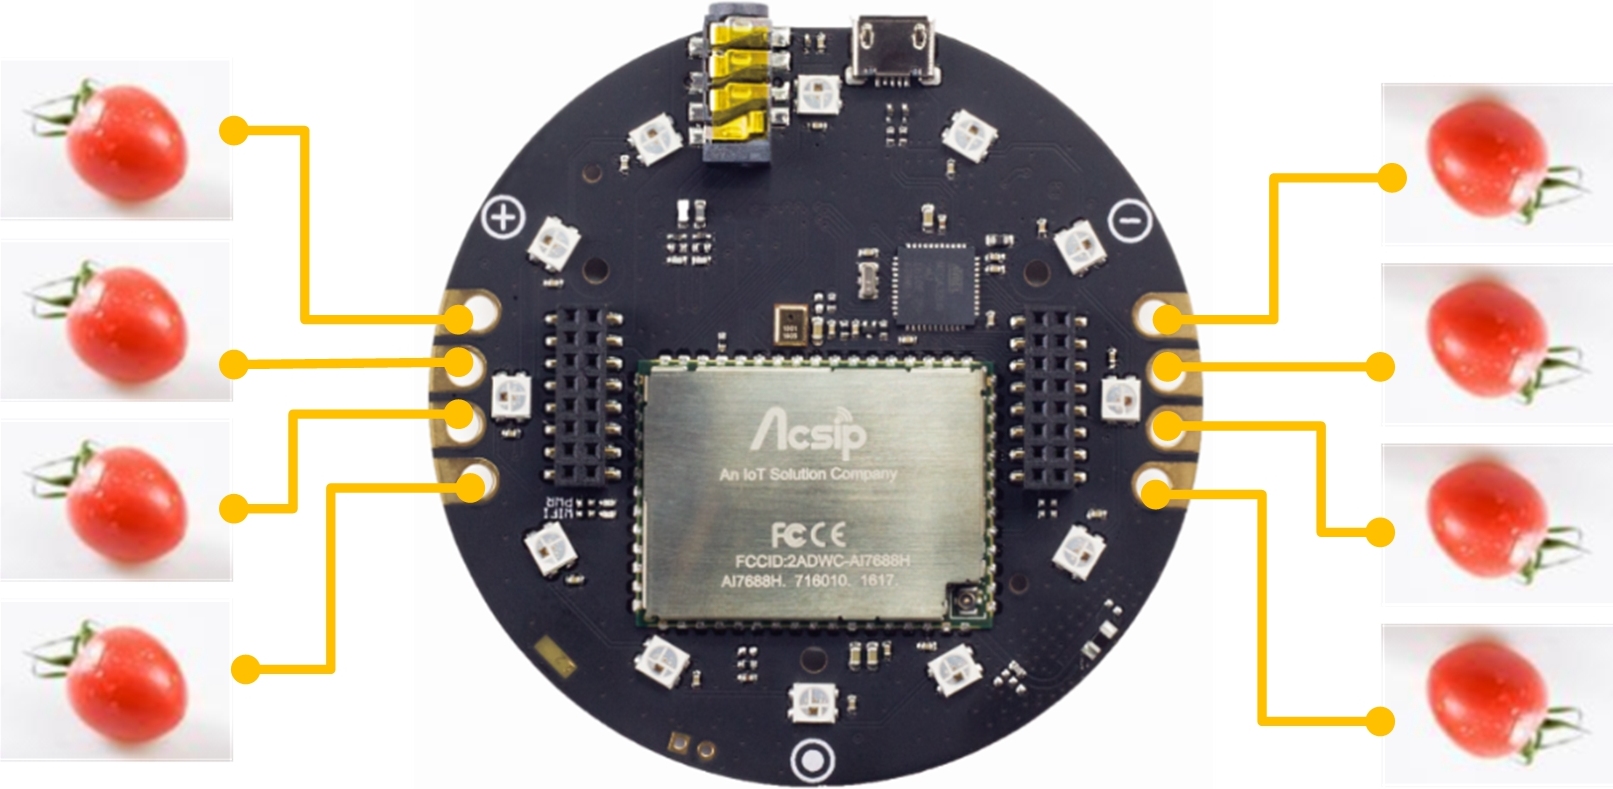
Getting Started
git clone https://github.com/respeaker/piano.gitOn ReSpeaker, download the repository- Download ReSpeaker Arduino Library in your computer
- Upload piano.ino to ReSpeaker's Arduino Leonardo (ATmega32U4)
- Run
python piano.pyon ReSpeaker's serial console
Weather Cloud

Weather Cloud is an awesome project for ReSpeaker. This cool build turns a ReSpeaker into a Weather Cloud, which is able to show you the whether with vivid light and sounds.
In this project, Openwrt is in charge of getting realtime weather information from the Internet, making voice interaction and audio output, while Arduino is responsible for controlling the colorful RGB LEDs.
Getting started
git clone https://github.com/jerryyip/WeatherCloud.giton ReSpeaker, download the repository- Download ReSpeaker Arduino Library in your computer
- Upload pixels_pattern.ino in ReSpeaker Arduino Library to ReSpeaker's Arduino
- Get OpenWeatherMap appid from here and copy it to
appID = ""inmain.py, don't forget to add your city incity="" - Stop mopidy service on OpenWrt before using SPI bridge
/etc/init.d/mopidy stop - Run
python main.pyand say "ReSpeaker, what is the weather like?" to ReSpeaker. - For more details about how to make a Weather Could, please click here.